Frequently Asked Questions

With so many lessons, faculty and staff may have trouble finding lessons that are relevant to their students . Luckily, we have tools to aid in your search to assign or suggest appropriate lessons:

  • Search: use cali.org's search bar (top right) to search CALI lesson names and descriptions. Please note: CALI's website search covers a LOT of material, so you may have to refine your search several times to find an appropriate lesson.
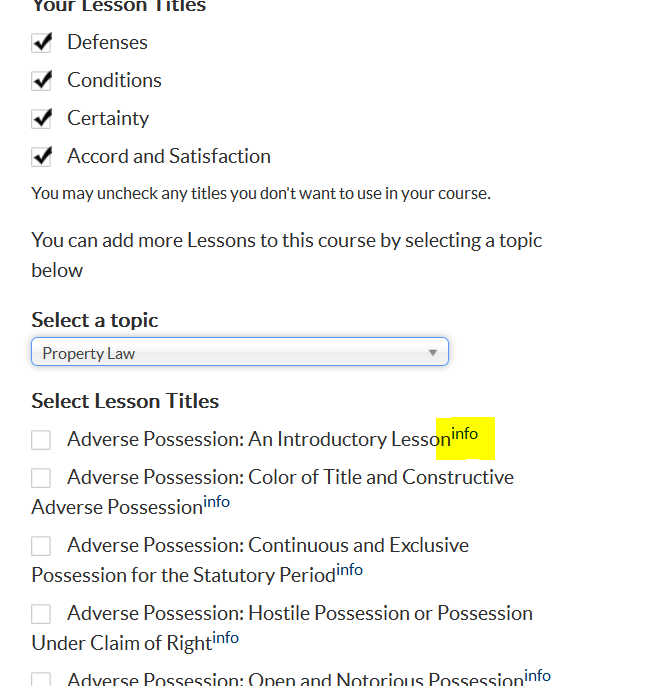
  • By topic: browse lessons sorted by topic, listed in alphabetical order. Some subjects' full list of lessons are very long, so don't forget about your browser's find function (CTRL + F or CMD + F) to search the page for keywords.
  • By author: many of our law professors and librarians write multiple lessons for us. You may even see your professor!
  • By subject outline: matches subtopics traditionally covered in certain subjects with corresponding CALI Lessons.
  • New lessons list: look here or subscribe to the new CALI Lessons RSS feed to see the newest CALI Lessons.
  • Updated lessons list: this lists the most recently updated lessons, also with an RSS feed.

Once you find a lesson, you most like would want to review its content. If you would like to review, you can, of course run the lesson as if you were a student. But there are a couple of faculty-only features to aid in your review of a lesson, and you may find these features more convenient than reviewing the student version:

  • Lesson Text - a full text version of the lesson that includes all questions, answers, and feedback contained within in the lesson; all on one web page. LessonText is easy to print and suitable for reading in your favorite comfy chair.
  • Mapper - a visual presentation of a lesson's structure showing branches and right/wrong choices.

Yes! The following features are available to faculty. Please note: you must be logged into CALI with a faculty account in order to view them.


  1. LessonText: This provides all of the content of the CALI Lesson - questions, answer and images - in a single webpage. It makes printing and reviewing a lesson much easier.
  2. LessonLink: This tool provides a special URL to an existing CALI Lesson. When students use that to take the lesson, faculty can view their performance via their LessonLink Dashboard.
  3. AutoPublish: This is a tool within the CALI Author software (which powers CALI Lessons) that allows faculty to edit existing lessons or write their own educational materials and publish it on the CALI website. AutoPublished lessons have the same score tracking ability as LessonLink lessons.
  4. Mapper: The lesson Mapper gives a graphical view of a lesson and allows you to see the various branches that some of our CALI Lessons have.

On the left hand side of every CALI Lesson page there is a box called "Teaching Guide".   Here's a brief overview of what they are:


  1. Mapper is the term CALI uses to denote a map - similar to a subway route map - that represents all the pages in a CALI lesson, choices students could make and the paths the lesson might follow. Some CALI lessons are rather complex in structure and include Socratic dialogues with the student where the student's choice decides the next question in the lesson.
  2. LessonText is a special feature that permits faculty to see an entire CALI lesson as a single text document. The lesson's text is displayed as a webpage and can be printed for viewing in a comfy chair or copied into a word processing document.
  3. LessonLink is a CALI Tool that allows you to view your students' performance on this CALI Lesson. For more information about LessonLink, read its FAQs and instructions.
  4. Download is what you click to download the lesson and all associated images in the CALI Author software format.  You will need to first download CALI Author.

LessonText is a special feature that permits faculty to see an entire CALI lesson as a single webpage that can be printed for viewing in a comfy chair or copied into a word processing document. LessonText is designed to help teachers see "inside" CALI Lessons to help them evaluate a Lesson. To locate the LessonText for a particular lesson:

  1. Log into CALI's website with your faculty account.
  2. Select the lesson you wish to see in LessonText format. You can select the lesson by browsing by subject area, casebook, or author.
  3. Click "Faculty View". This will take you to the LessonText of the lesson.

Once you find a lesson, you most like would want to review its content. If you would like to review, you can, of course run the lesson as if you were a student. But there are a couple of faculty-only features to aid in your review of a lesson, and you may find these features more convenient than reviewing the student version:

  • Lesson Text - a full text version of the lesson that includes all questions, answers, and feedback contained within in the lesson; all on one web page. LessonText is easy to print and suitable for reading in your favorite comfy chair. The link to the LessonText appears on the informational page of each lesson.
  • Mapper - a visual presentation of a lesson's structure showing branches an d right/wrong choices. This allows you to see the various paths a student may take through a lesson.

To locate the LessonText for a particular lesson:

  1. Log into CALI's website with your faculty account.
  2. Select the lesson you wish to see in LessonText format. You can select the lesson by browsing by subject area, casebook, or author.
  3. Click "Faculty View". This will take you to the LessonText of the lesson.

Mapper is a pictorial representation - similar to a subway map - of a lesson's contents. Faculty use Mapper for a variety of reasons. Some faculty like to see the extent (number of questions, amount of branching in a lesson) of a lesson before reviewing it themselves or assigning it to their students. Mapper can also be printed out for use in class, or even open on the faculty member's computer screen during class. This allows faculty to know the "right" path through a lesson's Socratic dialogue. As the class debates a choice in open class, the professor can guide students through the lesson knowing places (1) where the lesson may loopback to the original question, or (2) take the students through a series of related followup questions often designed to challenge the students initial response or to fill-in knowledge the students may be lacking. Of course, these same reasons for using Mapper are applicable for any lessons worked through by students during a professor's office hours. Mapper's benefit is faculty can use it to guide students through a particular sequence of questions.

Yes, however only faculty may download CALI Lessons to their computer. Using our AutoPublish feature, you can then republish the lesson with any edits that you choose to make.

Yes, we allow (and encourage!) faculty to edit or modify existing CALI Lessons to better suit their pedagogical needs. It's just another of the many benefits we provide our members. To edit CALI Lessons, faculty will need to download and install the CALI Author software. As with any software or tool, there is a slight learning curve with using it, but for the most part, if you can use a word processor and webpages, you can use CALI Author. Of course, we are always happy to provide training or tips on using it. After editing, the new lessons can be republished to the CALI website via the AutoPublish feature. Don't worry - you're not going to replace the existing lesson! The edited lesson appears on a separate place on the website only discoverable by those whom you give the URL to. As an added benefit, AutoPublished lessons have score and performance tracking capabilities.

Yes! You can easily post a link directly to a CALI Lesson, LessonLink, CALI Author self-published lesson, or QuizWright Quiz in Learning Management Systems (LMS) like TWEN, Blackboard, Canvas, D2L, etc. There are two tips to make sure this works correctly:

  1. Suggest students log into CALI before following the link to the CALI Lesson. They can always log in when the arrive, but they may get an access denied error for LessonLinks and Self-Published CALI Lessons and become confused.
  2. Set your link to open in a new webpage, completely outside of your LMS.

At present, you cannot automatically transfer scores from CALI Lessons into your LMS. 

Just like any link, you can post a link directly to a single CALI Lesson to direct your students to it. Just click on the lesson name in the list of lessons, copy the URL from your browser, and then paste that URL wherever you like. Just like this: /lesson/815 But - and this is very important - in many classroom management systems the links will not work correctly unless you set the link to the CALI lesson to open in a new window. Oftentimes a LMS' default is to open links within the LMS or with a LMS wrapper around the external link. CALI lessons don't react well to that. So when you're using TWEN, Blackboard, Canvas, D2L, or any LMS, always double-check your own CALI link and ensure the link opens in a completely new and clean window. NOT within the LMS.

Signs that your LMS link will be problematic:

  • Looking in your LMS link's properties or settings, you see that the option to "open link in new window" (or similar) is not checked or selected.
  • You follow your link and it opens with the frame of your LMS around it.
  • Your LMS or college logo is visible after following the CALI lesson link.
  • The URL in the window starts with anything other than our website's: https://www.cali.org.

The registration process is the same for all users. The authorization code provides the differing levels of access on the CALI site. To register:

  1. There is a link titled "register" in the menu bar on the top of the website.
  2. Fill out the form provided. You will need to chose a username, password and provide an email address.
  3. You will also need to provide the CALI Authorization Code for your institution. If you do not have the code, your institution's Authorization Code contact can be found on this list. CALI is unable to provide authorization codes over the phone or via email. You will have to get it from your school representative. They are also sometimes kept in the library or on school intranets.
  4. After typing in the Authorization Code, be sure to hit enter or click the cursor away from the box, as this will initiate the authorization process. Make sure you have a Faculty Authorization Code. This will allow you to use special Faculty Tools on the CALI.
  5. Fill out the rest of the form and click the "create a new account" button at the bottom of the webpage.

No problem.  Please email feedback@cali.org and we can fix your account.  Be sure to include your username or email address in the message.

LessonLink (14)

LessonLink is a feature of the CALI website that allows faculty members to assign CALI Lessons, QuizWright quizzes, and CALI Author self-published lessons to their students.  When students work on one of these CALI resources via a LessonLink, the faculty can track student performance, view grades, and access detailed analytics.

LessonLink creates a unique URL that teachers provide to students. Once students begin work on a CALI Lesson or other resource uisng a LessonLink teachers have access to the students' work at varying level of detail. There is a basic grade report that shows how students did on on a particular Lesson or Lessons. Grade reports can be viewed online or downloaded as a spreadsheet. For a more detailed review there is an analytics view of student performance that shows how students did with the Lesson and offers question by question comparions across all the students in your class.

When using LessonLink there are some things to keep in mind:

  • Grades and performance data for LessonLinks are only visible online to the faculty member who creates the LessonLink. In a co-teaching situation grade information will need to be downloaded as a spreadsheet and shared among colleagues.
  •  Anyone with a CALI account and the LessonLink can run the lesson - it is not unique to a particular law school. The lesson performance of anyone who follows the LessonLink URL (and only those people) will be viewable by the faculty member who created the LessonLink.
  • Faculty members may create an unlimited number of LessonLinks.  You should create new LessonLinks each semester so as to seperate the data.  Only the faculty who creates the LessonLink will be able to view the results.
  • LessonLinks do not prevent students from running a CALI Lesson directly. If a student runs an assigned Lesson directly from the Lesson page there is no way to convert that into a LessonLink.

While faculty members could always use CALI Lessons, QuizWright quizzes, or CALI Author self-published lessons to provide self-paced learning opportunities or formative or summative assessment and then collect completion certificates as evidence of completed work, LessonLink provides faculty with the ability to assign Lessons and provides teachers with information about:

  • who took a lesson
  • how many times they took it
  • when they took it
  • what their grade was, and
  • how they performed on a question by question basis

Creating a LessonLink is very easy! The whole process takes about five minutes.


  1. Make sure you are logged into CALI with a Faculty account.
  2. Go to the LessonLink page on the CALI website.
  3. Click the button to "Create New LessonLinks".
  4. Enter your course name. This can be anything you would like.
  5. Pick the semester in which students will be using the LessonLinks, not when you are making it.
  6. Select the CALI topic area which best describes your course. If you are teaching a class that covers more than one legal subject area, don't worry! You can back later and select another topic.
  7. A list of all the CALI Lessons tagged with that subject will appear. You can then check the box next to the lessons that you would like to create LessonLinks for.
  8. Click "Create LessonLinks" at the bottom of the page.
  9. At this point you will be taken to a page that is titled with the name of the course you entered in Step 4 above. This page will have all the LessonLinks you have created.


Once you've created a set of LessonLinks here are some ponts to consider


  • There is an option to edit or add LessonLinks this course's list of LessonLinks. Just look for the add/edit link.
  • You should also receive an email with the URLs of your course page and LessonLinks. If the email doesn't show up in a few minutes please check your spam/junk folder.
  • The URL of the course page or the URLs of each individual LessonLink can be shared with your students via email, your school's LMS (Canvas, Moodle, Blackboard, TWEN,etc) or any other means of communication.
  • Using the course page or the individual LessonLinks depends on whether you wish to allow the students to view all of the LessonLinks at once or if you prefer to make them available on a more structured basis.
  • To view student scores and performance, go to your "Current LessonLinks" dashboard. From there you can click the "details" button to view more information.
  • While you can put a LessonLink URL into a Microsoft Word document, but students won't be able to Ctrl-Click to follow the link.  This is a limitation of Word and not LessonLink. Converting to PDF is your best option. This article explains all the gory details.

When you're creating a set of LessonLinks for a course selecting a topic just generates a list of CALI Lesson titles. Deciding which Lessons to add to the course using those titles lists is a bit daunting. To help with the decision about whether or not to add a Lesson to the course you can click on the info link next to each title to see a pop-up window with the full description, approximate completion time, and author for the Lesson. This data should make adding Lessons to a course a bit easier.

Yes, once you've created a set of LessonLinks for a course you can edit the details of the LessonLink set and add or remove Lessons from the LessonLink set.

To get started just look for the Edit/Add LessonLinks button on your LessonLink pages under the title of your course.

Click on the the button to open the LessonLink edit form.

With this form you can edit the name of the course, edit or add a website for the course, remove Lessons from the list of links by clearing the checks, or add more Lessons by selecting a topic from the drop down.

Once you're down with your edits, just hit the submit button at the bottom and your LessonLinks will be updated.


You can copy or clone a set of LessonLinks for use in another course, section. or semester by logging in to the CALI website and visiting your LessonLink pages. You'll find buttons for cloning LessonLinks on the current and archive LessonLink pages.

Cloning is simple, just click the clone button for the LessonLinks you want to copy. The button will take you to a page that lets you change the Course Name, select the semester that the LessonLinks will be used, and add or remove Lessons from the course. Once you're ready just hit the submit button and your new set of LessonLinks will be created. Information about your new LessonLinks will be on the current LessonLinks page and you should receive an email with the list of LessonLinks.


You should create new LessonLinks every semester. At the end of a semester you'll notice that links for the semester move to the archive tab, so it's a good idea to create a new set of LessonLinks every semester.

  1. Even if you are still using it, the LessonLink is filed in the semester that it was created.
  2. All student answers are cumulative for the life of the LessonLink. The purpose of LessonLinks is to view student performance, either on an individual or class basis. The results from every student that has ever taken the lesson will remain in the dataset on your LessonLink dashboard, making it difficult to find specific students and skewing aggregate results.

Besides, it takes less than five minutes to create a LessonLink! View the instructions for complete details.

I want to use a CALI Lesson in class to see student answers, reviewing the answers live in class and optionally posting results on a screen in the classroom. How can I do that?

CALI LessonLive is a feature that extends CALI LessonLink to allow teachers to use CALI Lessons and Self-Published Lessons live in the classroom and instantly get results as students work through the Lesson. When used with QuizWright Quizzes or CALI Author and Self-Published Lessons law teachers at CALI member schools can create assessments for real-time use in the classroom. LessonLive provides robust analytics and reporting to teachers to help them assess the work of their class. The analytics and reporting available through LessonLive is also available for LessonLink runs using the analytics features.

The video below provides an in-depth introduction to using LessonLive.


A CALI Course page is a single page that contains all of the LessonLinks a teachers creates for a course.  During the initial LessonLink creation process, a faculty member enters a course name for the set of  LessonLinks being created. Faculty members have the option of sharing the URL of this course page with students or sharing each LessonLink URL separately. The course page provides the teacher who created the LessonLinks with a small dashboard area the provides buttons to access student grades, add or edit the LessonLinks, and clone the LessonLinks to use in another course.


Generally speaking, only the student knows which CALI Lessons a student has taken and what their score was. However, if a faculty member would like to use CALI Lessons for formative or summative assessment, they have a few options to find student scores.


  1. They can have students submit a lesson certificate that shows their completion and performance on a CALI Lesson. Each certificate lists the students' name, when they finalized the lesson, how many questions were attempted and how many they answered correctly.
  2. If you use LessonLink, you will be able to view the scores and question-by-question performance of your students on a CALI Lesson.

Generally speaking, faculty are unable to view student performance on CALI Lessons. There are three exceptions:

  1. Students provide the faculty member with a printed or digital version of the certificate that appears at the end of Lessons. This will provide only the score for the Lesson.
  2. The faculty member creates a LessonLink and can view the scores and question by question performance directly via the "Current LessonLinks" tab for LessonLinks created that semester, provided that they are logged in with the faculty account that created the LessonLink.
  3. The faculty member creates a QuizWright quiz or uses CALI Author to create a self-published lesson and can view student scores and question by question performance via the "My CALI Library" link from the CALI Dashboard menu.

For information please visit the FAQs on LessonLink, QuizWright, and self-published lessons.


LessonsLinks used in a Microsoft Word document may not work as expected and we recommend that you do not distribute them that way. When you use the <CTRL><Click> feature in Word the info that is sent to the web browser besides the link causes the web server to ignore any cookies that are set and that makes our site think that the students are not logged in. If they are not really logged they get the login form and can run the Lesson. If they are logged in to CALI, they get an error. This is known issue when linking to access controlled websites from inside of Word documents.


Students should be able to copy and paste the link from the Word document to the browser without any problem. We recommend providing students with the link to the list of LessonLinks that is created with each set of LessonLinks or posting the links on a CALI Classcaster course blog.

If your professor is using LessonLink and you correctly followed the special URL your professor provided to you, your professor will see your scores by viewing their LessonLink Dashboard. You won't have to do anything. However, if you did not use the URL that your professor gave to you, they will not be able to see your score.

If your professor is not using LessonLink or you did not use the URL that they provided, you can still show that you've taken a CALI Lesson by printing off the CALI Lesson Certificate. Please view the FAQ on printing CALI Lesson Certificates for complete instructions on how to print or save them.

A CALI LessonLink Lesson will appear exactly like a regular CALI Lesson. That's because it is one!  It just have a special URL that allows your professor to track your score and performance. There are a few ways to tell if you are taking one.

  1. When you are running a CALI Lesson look for the LessonLink logo and your professor's name in the upper left of the Lesson viewer.
  2. You are sent to a CALI Courses page with several lessons listed. It will have "courses" in the URL and the CALI Lessons listed will have "LessonLink" in their URL.
  3. The URL of the CALI Lesson that your professor gives to you has the word LessonLink in it.
  4. When you view your "My Lesson Runs" dashboard, your professor's name will appear in the "professor" column. If it's a regular CALI Lesson, this column will be blank.

If you are not seeing any of these indicators then you are not using a LessonLink and you should contact your professor to get the correct information.

QuizWright (3)

CALI QuizWright is a tool for creating and publishing formative assessments for your class. QuizWright gives law faculty a web-based platform to create and manage personal question banks and quizzes for their students. Using CALI Publisher, LessonLive, and LessonLink, QuizWright quizzes can be delivered to students and taken in real time in the classroom or assigned as homework using the familiar CALI Lesson Viewer.

The FAQs below should answer most of your questions about QuizWright. If not, email Elmer at emasters+qw@cali.org

Use QuizWright at https://www.cali.org/quizwright

This is a brief outline of how to use QuizWright to create and publish a quiz or other formative assessment. 

  1. Visit the CALI website at https://www.cali.org/ and log in using your CALI account.
  2. From the "CALI Dashboard" menu near the top of the page select "QuizWright".
  3. This will take you directly to the QuizWright homepage, no need to login again.
  4. Click the "Add a question" button to jump right in and begin creating your own personal question bank.
  5. On the "Quiz Questions" page select the question type you'd like to create. The choices are "True/False", "Yes/No", or "Multiple Choice".
  6. On the "Quiz Question" page enter your question, the correct answer, and, for MC questions, up to 3 incorrect choices.
    • Note that the choices will be presented to your students in a random fashion for each question.
  7. You can optionally add feedback that will be displayed when a student answers a question. The feedback is displayed no matter the answer a student chooses.
  8. When you're done with the question you can keep adding questions or create a new quiz
    • Note that you need to click one of the buttons to save the question you are working on. If you leave the page or click another link the question data on the page will be lost.
  9. Once you've added all of the questions you want for now hit the "Prepare the Quiz" button.
  10. The "Quiz Questions" page now displays a listing of questions that haven't been added to any quizzes yet. For a full list of your questions select "All" in the "Filter Questions" section.
  11. Select the questions you would like to add to the new quiz and hit the "Add to new Quiz" button.
  12. On the "Quiz Information" page fill out the form and hit "Save Quiz".
  13. That brings you to the "Quiz Details" page. From here you can
    • "Publish Quiz" to the CALI website using CALI Publisher
    • "Change Questions" to re-order your quiz questions
    • "Edit Description" to change the details of your quiz
    • "Publish Later" to save the quiz for later
  14. Hit "Publish Later" to save the quiz.
  15. Before publishing a quiz to the CALI website, click on "My Profile" in the left hand menu. Complete this form with your information that will be added to each quiz you publish.
  16. Use "My Quizzes" in the left hand menu to get to a list of your saved and published quizzes.
  17. From the "My Quizzes" listing you can
    • reorder, and remove questions from a quiz
    • get the quiz details with links for publishing the Lesson
    • review and edit the quiz's description
    • preview the quiz as your students will see it

Following these steps will help you build a personal question bank and prepare quizzes for your students. For information on how to give a QuizWright quiz to your students see https://www.cali.org/faq/16762.

Once you've created some questions and bundled them into a quiz the next step is to publish the quiz and give it to your students. Using CALI Publisher, LessonLive, and LessonLink, QuizWright quizzes can be delivered to students and taken in real time in the classroom or assigned as homework using the familiar CALI Lesson Viewer.


This How To covers the use of CALI Publisher and LessonLive to publish and track quizzes for your students.


Please note that your students will need to log in to the CALI website in order to take QuizWright quizzes.


How to publish a QuizWright quiz to CALI Publisher


  1. Visit the CALI website at https://www.cali.org/ and log in using your CALI account.
  2. From the "CALI Dashboard" menu near the top of the page select "QuizWright".
  3. This will take you directly to the QuizWright homepage, no need to login again.
  4. Click the "List my quizzes" button or the "My Quizzes" menu link to open the list of your quizzes
  5. Click the "Details" link in the "Publish" column of the quiz you want to publish
  6. Click the "Publish Quiz" button on the "Quiz Details" page to start the Publisher process in a new tab/window on the CALI website.
    1. Note that you may see a message about pop-ups or new windows being blocked for the CALI website. If you get this message please follow your browser's instructions to allow pop-ups from the CALI website.

  7. If you're not logged in to the CALI wesbite, you may see an "Access Denied" message. Don't panic! Just login with your faculty account using the login boxes and you'll be fine.
  8. Next you'll see the QuizWright quiz as published on the CALI website, no need to do anything else.
  9. Check your email. You should have a message from the CALI webmaster with the link that allows you and your students to take your QuizWright quiz. Send that link along to your students by email, through your website, TWEN page, Blackboard, etc. or as with CALI LessonLink


How to use LessonLive to give a QuizWright quiz in real time


  1. Make sure your students have CALI accounts and can log in to the CALI website before starting the quiz. The quiz will run fine on mobile devices as well as laptop computers but students need to be logged in on the CALI website to take the quiz.
  2. Once everyone is logged in have your class follow the link to the quiz page. This was emailed to you in the step 8 above.
  3. Students should click on the "Start this Faculty Published Quiz" button to take the quiz.
  4. When you click on the the "Start this Faculty Published Quiz" button LessonLive will engage and you will be able to track students results on the quiz in real time.


For more information about LessonLive please check the FAQ.


How to add a QuizWright quiz to LessonLink


  1. Go to your LessonLink dashboard by collowing the "LessonLink" link in your "CALI Dashboard" dropdown menu.
  2. Either create a new set of LessonLinks or edit an existing course.
  3. From the "Select a topic" list pick "Your CALI Library Resources" (it's at the bottom of the list)
  4. From the list of resources that appears check the quiz or quizzes you'd like to add 
  5. Click submit to create the LessonLink(s). You should receive an email with cutom trackable LessonLinks to give your students.


For more information about LessonLink please check the FAQ


You will always have access to the results of your QuizWright quizzes through the "My CALI Library" link in your "CALI Dashboard" dropdown menu.

Yes! The CALI website is mobile responsive so students can take QW quizzes on their phones or other mobile devices.

Self-publsihed lessons use a feature within the CALI Author software that allows faculty members to create their own lessons, quizzes or study aids.  It also provides the opportunity for editing existing CALI lessons. This could be done to change the length of a lesson or to add in jurisdictional differences, for example.

All Self-Published Lessons appear on the CALI website and have the same style as "Official" CALI Lessons.  However, only those people with the URL of the AutoPublished Lesson will be able to find and use it.  It will not appear in search results of the CALI website nor will edited lessons replace the "Official" version.

CALI Lessons and Self-Published Lessons look a lot alike - after all, they reside on the same website and are created with the same software. They will also both show up in a student's "My Lesson Runs" dashboard. However, there are some important differences between the two:

  • CALI does not review the content of Self-Published Lessons, nor do we modify or update them. Self-published lessons are purely the creation of your professor and, thus, CALI makes no gaurantees about self-published lesson content.
  • Self-published lessons are not publicly visible at cali.org, unlike regular CALI Lessons available to all authorized users through the CALI Library of Lessons. Only users who have been given the URL to an self-published lesson have access to that lesson.
  • Self-published lessons have a special SPL logo in the upper-left, in place of the CALI Lesson logo found on regular CALI Lessons.

Self-published lessons allow faculty at CALI member schools to edit and customize CALI Lessons or create their own lessons and quizzes from scratch using CALI Author. A self-published lesson is published to the CALI website to make it visible to anyone who has the link to it. Self-published lessons on the CALI website provide scoring and performance information for all student who work on the lesson..


Some notes:


  • You must have a CALI faculty/staff account to self-publish lessons from CALI Author.
  • Only registered CALI users can work on self-published lessons published on the CALI website.
  • If you wish to leave a CALI Lesson as it is, considered using LessonLink. This will give you all the same scoring and performance options.


Self-publishing a lesson;


Lessons you create with CALI Author can be published to the CALI website and made available for your students. Self-published lessons do not become part of the publicly-available library of CALI lessons and are only available to whom you provide the URL.


  • Once you have completed your lesson, publish your lesson from your Lesson Library. From your open lesson, go to File in the upper left corner and choose Save & Exit to Lessons Home. From there, enter your Lesson Library.
  • Find your lesson in the list and select the arrow icon for Publish my lesson on www.cali.org. (Hovering over the icons will reveal their functions.)
  • Choosing to publish will take you directly to the lesson where you can run the lesson or copy the lesson URL that you can provide to students so they can log in to the site and run it. You will also receive an email with the lesson URL from webmaster@cali.org with the subject “[CALI] About Your Self Published Lesson.”
  • Once you have published your lesson, a new option to Run my published lesson on www.cali.org that looks like a play button will appear in your CALI Author Lesson Library for that lesson.


Tip: If you publish your lesson then make additional edits, you will need to re-publish for the changes to take effect on the published version. From your Lesson Library, choose the arrow icon to Update my published lesson on www.cali.org

Yes, yes you can!

  1. Make sure you are logged into CALI with the faculty account that published the self-published lesson.
  2. Select "My CALI Library" from the CALI Dashboard menu.
  3. Go to your list of Self-published lessons.
  4. FInd the lesson title you'd like details on and click on "Results" for basic scores or "Analytics" to get a more detailed break down of student performance. You can also download a spreadsheet of basics scores.
  5. On the "Results" page, clicking on the percentage score of a student will open a page with more details of how the student did.
  6. The "Analytics" page provides you with more indepth analyisis of how students performed as a group across the entirety of the lesson.

Yes, simply login with your faculty account then:

  1. Select "My CALI Library" from the CALI Dashboard menu.
  2. Go to your list of Self-published lessons.
  3. Select the title of the lesson you want to delete or hide.
  4. This will take you to the page for the lesson.
  5. Clcik on the edit tab to make changes to cover page for the lesson.
  6. If you wish to hide the lesson, scroll down to the bottom of the page under "Publishing Options" and uncheck "published" and then click save.
  7. If you wish to completely delete the lesson, scroll down to the bottom of the page and click the "delete" button.

Please note that while this hides or deletes your self-published lesson on the CALI website the lesson continues to exist in your CALI Author library.

No. Access to many resources hosted on the CALI website, including self-published lessons, require the user to be logged into the CALI website. Only individuals associated with CALI Member schools and organizations are able to do this.

Self-publsihed lessonss are the sole creation and responsibility of their author.  You can tell you are taking an self-published lesson by the "Self Publsihed" logo in the upper left corner of the lesson.

CALI does not review self-published lessons nor do we make any guarantees about their quality or content.  If you have any questions about the material, please contact the author of the self-published lesson.

It does happen, although they will be subject to the same editorial and review processes before becoming an official CALI Lesson. Please contact Deb Quentel (dquentel@cali.org) for more information.

Built on the Open Textbook and Pressbooks plugins for Wordpress, CALI Lawbooks provides a robust platform that allows members of the CALI community to create their own law books including casebooks, textbooks, supplements, teaching guides, hornbooks, and monographs. The system uses an easy to learn browser-based editor for writing, allows for drag and drop organization of material and chapters, provides a fully functional web version of the book, and exports to a number of popular formats including PDF, EPUB, and MOBI.

  1. Make sure you have a valid CALI account.
  1. Visit http://lawbooks.cali.org, scroll to the bottom and log in with your CALI account information.
  1. Once logged in you are taken to your Lawbooks profile page. From here you can create your new book or manage existing books.
  1. Before getting started take a few minutes to review the info on the profile page and add any additional information you'd like.
  1. In the upper left under My Catalog select Add a New Book to create a new book.  
  1. Fill out the form to create a new book. 
  1. For the site domain, keep it short, letters and numbers, no spaces or special characters. We recommend something like lastnametopic to keep it simple and easy to type.
  1. For site title feel free to use the full title of the book.
  1. Set the privacy option to no while you are working on the book. You'll be able to change this later.
  1. Hit the create site button to create the new book.
  1. Your book is created and you are taken to the dashboard for the book, all ready for you to start adding content.
  1. In the new book's dashboard click on Appearance and set the active theme to Open Textbooks if it isn't already set. Using the Open Textbook theme activates a number of useful features in Lawbooks.
  1. Click on Text to open the Organize page and delete the sample content that was created
  1. This will reduce confusion later
Once you've created a book we recommend that you take a few minutes to provide some basic information about the book by completing a couple of the settings pages. Adding this meta data to the book now will make it easy for people to find later.
Let's start with Book info:
  1. Select Book info from the left hand menu.
  1. Edit or add information about your book as you see fit. Fields include:
  1. variations of the title
  1. Author name(s)
  1. Publisher info
  1. Copyright & Licensing
  1. You should select a Creative Commons license for your work. The Lawbooks platform is about open, so we like to host works that are freely available to the law school community.
  1. Additional book and catalog information
  1. Once you're done adding info, hit the save button at the top right.
 
CALI Lawbooks allows you to collaborate with people in various rolls while writing your book. The editor, author, contributor roles allow you to add people to help it the various aspects of creating your work. The subscriber role lets people in to read and comment on the work even if it has not been published yet. 
To add a collaborator to your book follow these steps:
  1. Make sure the person has an active CALI account. This is important since the system uses CALI accounts for log ins.
  1. Have the person visit lawbooks.cali.org and login. This gets them into the Lawbooks system so you can add them to your book.
  1. Make sure you have the email address associated with the account you are going to add to your site.
  1. Login to your book and go to the dashboard.
  1. Select "Users" and "Add New" from the left hand menu.
  1. Under  "Add Existing User" enter the person email address that is associated with their CALI account, select the role you would like them to have and click the button.
  1. This sends an email to your new collaborator. They should click on the link in the email to activate the Lawbooks account. 
  1. Note the email may end up in a spam folder, so if it doesn't show up in a few minutes, make sure they check there.


Classcaster® is a course website, blogging and podcasting system that provides an exciting and engaging way to interact with students and communities. In addition to blogging tools, a Classcaster® site provides options for recording and posting podcasts, lectures, interviews, and class summaries as well as sharing documents and files.